Tuesday, November 17, 2015
biopunk text soft launch
Here is a free, readable online version of a biopunk book I recently self-published to accompany my current exhibition. Enjoy!
Sunday, November 8, 2015
Mangling Methodologies in biological art and display practices (moderated by Dr Tagny Duff)

BODILY ENGAGEMENT

Textile and other craft-making practices
assume and privilege a direct bodily engagement with materials. These hands-on
making methodologies require dexterity, haptic understanding, a textural
interpretation—in essence, a material fluency developed through corporeal
translation. I’ve dubbed this process, “haptic epistemology”, or the method of
generating knowledge through touch or membranous contact with forms.
This forms a core principle of my working
craft methodology. However, it’s one I’ve had to rework and adapt in
negotiating the intersection of textile and biological craft. The same practices
and rule sets cannot necessarily apply across disciplines but some bridging has
happened and I’ll address that in a minute.
Some textile-based haptic methods I’ve
abandoned out of necessity include:
·
using my mouth and teeth as an
extra hand for holding, pulling or cutting string;
·
using my saliva to smooth the
fuzzy end of a thread before threading it through a needle, or to spin yarn;
·
using my fingernails as
tweezers;
·
holding my work close to my
face to see the tiny details, holding it directly in my hand to feel its
texture and assess its form;
Engaging in these tricks, shortcuts and
assessment methods in producing textile objects would literally destroy
laboratory-based microorganisms—this is of course due to the bacteria and fungi
ever-present on my hands, my breath, my hair, every part of me. So, there are
new rules to follow, new barriers to accept, new protocols to adopt and invent,
in order to grow live tissue on a textile.
ADOPTED METHODS

ASEPSIS AND BARRIERS
Working with tissue culture, coaxing a ‘life’
form to re-form itself into a sculptural object on a predetermined woven scaffold,
requires self-containment, asepsis and the institution of various levels of
barrier. Biocraft methodology—and I say “biocraft” when referring to tissue
engineering because it IS a craft process, in the production of a functioning
form—requires preventing direct skin contact with any of your materials or
tools. Some materials are toxic to humans, but usually it's humans who are the
mortal threat to vulnerable cell cultures.
The imposition of a handcraft process on an
aseptic environment, attempting to mesh direct engagement of the body with an
elaborate system of establishing bodily barriers, is challenging to the act of
making.
If weaving is meticulous, weaving in the
miniature under a flow hood, wearing gloves and misting everything with
ethanol, is painstaking, and hazardous: precision is lost, your endurance is
challenged and touch becomes a very complicating factor. The haptic
epistemological methodology can be the process of destruction, erasure, and
cell death—and for the artist, it could mean the epic failure of a months-long
project.
FAILURE AND FUTILITY
Failure and futility are inherent
principles in life science methodologies, principles that the practitioner must
come to terms with. The majority of experiments will fail. This is especially true
in bioart where nonspecialists apply protocols of tissue engineering, with very
little initial understanding of what they’re doing. Artists with
product-oriented agendas will be disappointed. One may argue that failure is also
an inherent principle in art-making but it is all the more poignant when
working with “living” or semi-living materials—these are organisms dependent on
the researcher for life support.
Negotiating, accepting and even embracing
failure, is a key component of adopting scientific research as an art-making
practice. This implies accepting a lack of control.
BUREAUCRACY AND BARRIERS
Elaborate controls are put into place
to regulate the use of biological materials. The perception of disembodied
bodily materials, such as human cells, are that of contagion regardless of
whether or not anything is actually contagious. You can’t catch cancer. You
can’t infect yourself with mouse tissue. These are the materials that I’ve
worked with and that I’ve had to complete numerous certifications in order to
handle, transport and display. These bureaucratic barriers may or may not be
entirely necessary all the time—however, one currently must embrace and work
within these rule sets in the adoption of bioart practice.
INVENTED METHODS

WET WEAVING
I want to switch now to elaborate on my
invented method for producing biotextiles, one that respects laboratory rules
and switches the focus of haptic epistemology from my process to that of the
microorganisms themselves.
Textile scaffold production happens through
a process I call “wet weaving”. In wet weaving, textile materials are stored in
fluid and manipulated while soaked. Fibres are immersed in ethanol for a period of
hours or days in order to induce and maintain sterility. Throughout the weaving
process, the weaving materials are kept wet with ethanol, and later rinsed with
phosphate buffer solution to prepare them for in vitro use. The entire life span of the textile is within a wet
ecology, including its later immersion in cell culture media as an engineered
scaffold for the cells, to its eventual ‘fixing’ in paraformaldehyde once the
experiment has concluded and the biotextile must be preserved.
In the wet ecology of my textile scaffolds,
it’s the cells themselves who perform the haptic epistemological process. The
resourcefulness of these non-neuronal (supposedly non-thinking) cells is
displayed in how they anchor themselves at fibre axes, at the intersection of
threads, extend towards each other, communicate through touch and collectively
build multicellular bridges within the woven structure. As the bridges widen,
the grid becomes the skeleton for new tissue formation.
NEW
PROTOCOLS

I want to end with this image, which
is an emergent development of new mingled protocols and performance, in the
disrupted gallery display and art administrative methods—here, staff have
adapted, embraced and upheld a new set of rules, specifically for this display
of biological art across the hall. I want to state that I consider this as much
the work as the work on display.
Friday, August 7, 2015
sonya/ osanna start to materialize
The girls are coming along. These are the first two samples/ attempts at creating weave structures that make use of a 6-colour CMYK warp on the Jacquard loom. I've been designing for weeks to refine the structures so that the majority of the image appears to be black & white, except for the girls' dresses (Materiality, anyone? Again, I'm thinking in meta).
In fact, nothing is black & white at all, but colour is often perceived in relation to what is next to it--colour IS relative to an extent, and Jacquard weaving makes use of the human eye to blend the pixels/threads of an image in the mind to produce a whole image-based cloth - similar to the way single cells come together to produce a whole piece of tissue. Both are materialized on matrices. I'm playing with the relationship between the French words 'tissu' (cloth/ tissue) and 'tissage' (weaving) in my methodology. Next week, I'll be working on the third sample cloth, which I hope will get this image closer to the end result I'm looking for. Once I've accomplished that, I'll move back to doing a double-sided image-based cloth, with osteosarcoma micrographs on the back side of the cloth - so, girls on one side, microscopic imagery of them on the other. Remember, Sonya and Osanna below represent the two young ladies whom bone cancer cells were taken from for lab use, back in the 60s and 70s (the original photo I'm working from was taken in 1964). These girls are tall. Osteosarcoma occurs most often in pre- and pubescent girls who go through a rapid growth spurt, becoming very long-legged very quickly, leading to mutation in the bone cells of the shins (typically). The osteosarcomas I'm working with came from two pubescent girls' shin bones. I very much enjoy the appearance of glitch in the first sample on the right, in terms of glitch = mutation.

In fact, nothing is black & white at all, but colour is often perceived in relation to what is next to it--colour IS relative to an extent, and Jacquard weaving makes use of the human eye to blend the pixels/threads of an image in the mind to produce a whole image-based cloth - similar to the way single cells come together to produce a whole piece of tissue. Both are materialized on matrices. I'm playing with the relationship between the French words 'tissu' (cloth/ tissue) and 'tissage' (weaving) in my methodology. Next week, I'll be working on the third sample cloth, which I hope will get this image closer to the end result I'm looking for. Once I've accomplished that, I'll move back to doing a double-sided image-based cloth, with osteosarcoma micrographs on the back side of the cloth - so, girls on one side, microscopic imagery of them on the other. Remember, Sonya and Osanna below represent the two young ladies whom bone cancer cells were taken from for lab use, back in the 60s and 70s (the original photo I'm working from was taken in 1964). These girls are tall. Osteosarcoma occurs most often in pre- and pubescent girls who go through a rapid growth spurt, becoming very long-legged very quickly, leading to mutation in the bone cells of the shins (typically). The osteosarcomas I'm working with came from two pubescent girls' shin bones. I very much enjoy the appearance of glitch in the first sample on the right, in terms of glitch = mutation.

Friday, July 24, 2015

Tuesday, July 7, 2015
e-zombie craft - incubator build part 1
I've completed the first step in the electronics setup for my incubator, which I'm building after the DIY model developed by Andrew Pelling (Pelling Lab) while he was researcher-in-residence at SymbioticA. You can see his setup and excellent instructions here for the entire incubator build.
The first part of the electronics build is the fan, which will circulate air inside the incubator and distribute CO2 and heat, which cells need to stay alive. Andrew Pelling's clear instructions for that build (with very helpful photos) are here and here. My experiment and comments (including additions to his instructions) are below.
Parts:
Inside PC towers are power supply boxes such as the two below (one on the left is in tact after I ripped it out of the tower, and one on the right is then further ripped open to reveal its guts).

It's not an easy process to wedge your way into the interior of these solidly-built, metal-encased things - but with the right tools and persistence, you can hack it open and find the treasures you seek. There are a lot of zip ties everywhere inside to clip off, and a lot of hidden screws to unscrew in order to get to the gold. The 'gold' in this case is a 12V fan. Let me clarify - it's a 12V fan with TWO wires (positive and negative). There are plenty of other fans inside the PC tower that are more easily accessible than ripping open the power supply, BUT those fans all have 3 or 4 wires and therefore are more complicated than what you need. I discovered on an online forum that I could find a simple 2-wire 12V fan inside the power supply. I must admit, I do get joy from the process of destruction when I know I'm going to be upcycling obsolete technology (which, by the way, I found on the curb near to my place). My living room floor was a mess, but a joyful mess.
One thing that Andrew doesn't mention, but which I feel is important to know, is that when you're scavenging parts out of the insides of old computers, they will be very dirty and dusty. You will have to clean them, particularly in this case since an incubator is supposed to be a sterile environment, or at least the possibilities for bacterial contamination minimized as much as possible. So, prep yourself with a can of compressed air, some rubbing alcohol and cotton swabs. Compressed air is great for cleaning dust and crap out of tiny spaces. Rubbing alcohol will finish the job and sterilize things to a certain point. *Ultimately, asepsis is a whole other issue.
I was pretty grossed out by the filth inside the computer towers I took apart (there were four of them). Your other option is to simply go to a computer repair shop and ask for a 12V fan with two wires. They must have tons. It likely won't be free, but then again, it might be.
 See that little white adapter on the ends of the fan cables? You can clip that off with wire cutters so that you can poke the ends directly into a breadboard. Or you can plug jumper cables directly into the adapter. I chose to clip it off.
I cleaned the fan blades like the obsessive perfectionist that I am, two or three times with rubbing alcohol, until no more caked on dust was to be seen.
Now, before you snicker about my wiring, I want to qualify that I am an artist, and I like the aesthetics of bare DIY electronics, and using excessive wiring is intentional. It was an awesome artist named Erin Sexton who showed me how to appreciate the aesthetics of excessive wire, gave me permission to get messy and stringy (and, being a textile artist, I clutched onto that idea for my own use). I could make neat little bridges in my circuitry, but I chose to have large, looping wires. And besides, this is the prototype, not the soldered unit that will go on the incubator - but the soldered unit will likely be loopy, too.
Here is the breadboard wired up with the fan (fan is barely visible in the background to the right):

Honestly, I wouldn't recommend designing your wiring from looking at mine. Andrew Pelling has much better photos with neat and tidy wiring that makes more visual sense. Mine is a jumble.
One thing Andrew forgot to include in his list of components needed: a 1N4007 diode. He does include the diode in his schematic.
That component is mentioned in the Instructable that Andrew refers to (well, the Instructable uses a 1N4004 but I used a 1N4007, since that is what is in the schematic). So, the revised list of components needed:
1x TIP120 transistor, 1x 1kOhm resistor, 1x 100uF cap, 1N4007 diode, 12V DC Fan, 12V power supply.
What I have here that Andrew doesn't show in his photos is this sweet little YwRobot power supply for the breadboard. You can get a similar one here. It even has an on/off switch, so you don't have to unplug your power source every time you want to change the wiring, code, whatever. Great for prototyping. My Arduino is running off the power supply to the breadboard (blue and yellow wires). This power adapter is for 5V, but my 12V fan is running just lovely with it. I've plugged a 12V power supply into it to test it out and it all works. Maybe it'll burn out faster, I'm not sure, but I'm not worried about it right now. The power source I'm using (the power cable I've got plugged into that breadboard power adapter) is an old cable from my Zip drive from many years ago. Sometimes it pays to hoard the obsolete tech! At this point, I have an electronics junkyard growing in my living room.
Here's another look - it's on and the fan is moving:

So, why not just plug directly into the Arduino to power the fan? Because technically it's a 12V power supply you want for the fan, and the Arduino can handle max 5V. For my prototype, though, I am running the fan on 5V. Ultimately, that might even be enough to circulate the heat and CO2. More testing will happen once the rest of the incubator is built.
This is what your IDE should look like, when uploading the fan test code to the Arduino:
(I think there's a newer version IDE available on the Arduino website, but anyway...)
This is the code I copied directly from Andrew Pelling's github and pasted into the Arduino IDE. And by the way, IDE stands for Integrated Development Environment in case you were wondering.

I've been playing with my new fan all day, happy to see life in my build. There is a clear and definite connection between something alive electronically and a biological system, something which I was only able to fully appreciate when I began working with both simultaneously. There is a huge amount of pride in making a system work, or building something that functions well. The process of building that system, whether hacking a biological system or an electronics/digital system, is akin to craft. Craft is making something that works. In the case of this fairly basic project, I've brought obsolete things back to life: electronics zombies! Then, shall we call this e-zombie craft for fun?
The first part of the electronics build is the fan, which will circulate air inside the incubator and distribute CO2 and heat, which cells need to stay alive. Andrew Pelling's clear instructions for that build (with very helpful photos) are here and here. My experiment and comments (including additions to his instructions) are below.
Parts:
Inside PC towers are power supply boxes such as the two below (one on the left is in tact after I ripped it out of the tower, and one on the right is then further ripped open to reveal its guts).

It's not an easy process to wedge your way into the interior of these solidly-built, metal-encased things - but with the right tools and persistence, you can hack it open and find the treasures you seek. There are a lot of zip ties everywhere inside to clip off, and a lot of hidden screws to unscrew in order to get to the gold. The 'gold' in this case is a 12V fan. Let me clarify - it's a 12V fan with TWO wires (positive and negative). There are plenty of other fans inside the PC tower that are more easily accessible than ripping open the power supply, BUT those fans all have 3 or 4 wires and therefore are more complicated than what you need. I discovered on an online forum that I could find a simple 2-wire 12V fan inside the power supply. I must admit, I do get joy from the process of destruction when I know I'm going to be upcycling obsolete technology (which, by the way, I found on the curb near to my place). My living room floor was a mess, but a joyful mess.
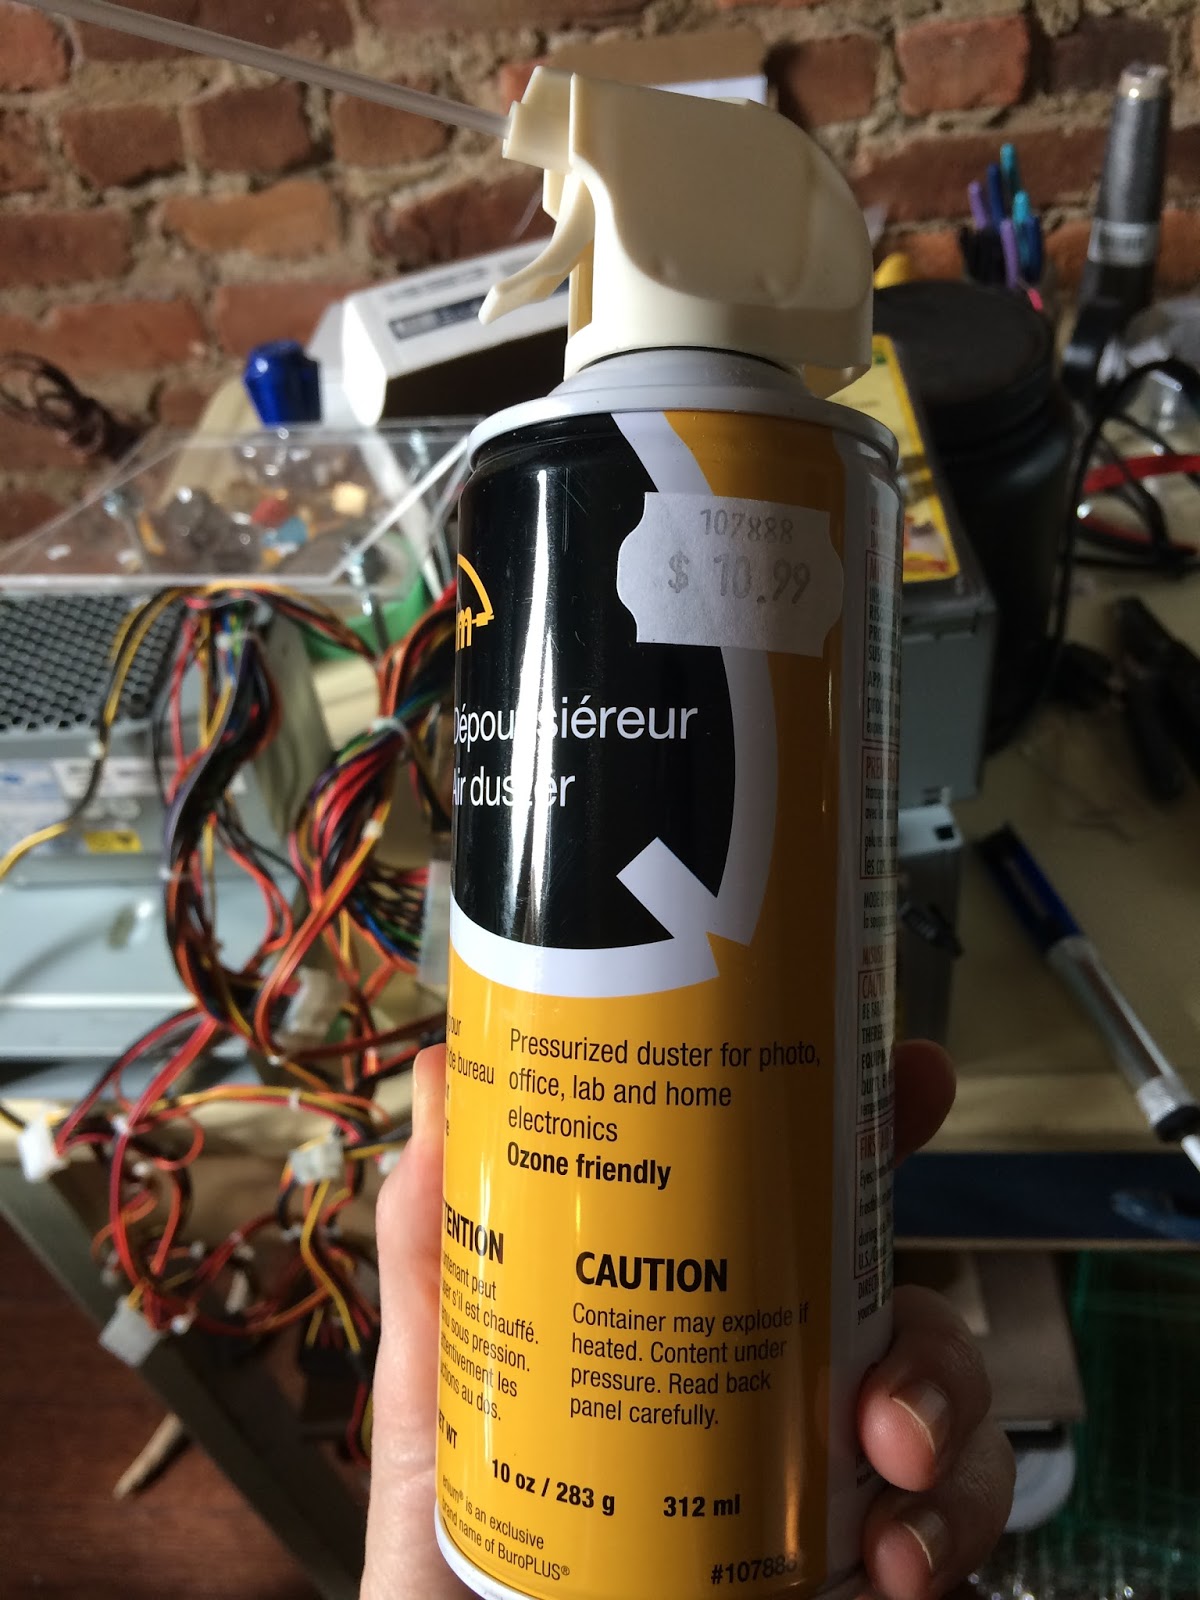 |
| Maybe you can find compressed air for cheaper than $10.99. |
I was pretty grossed out by the filth inside the computer towers I took apart (there were four of them). Your other option is to simply go to a computer repair shop and ask for a 12V fan with two wires. They must have tons. It likely won't be free, but then again, it might be.

I cleaned the fan blades like the obsessive perfectionist that I am, two or three times with rubbing alcohol, until no more caked on dust was to be seen.
Now, before you snicker about my wiring, I want to qualify that I am an artist, and I like the aesthetics of bare DIY electronics, and using excessive wiring is intentional. It was an awesome artist named Erin Sexton who showed me how to appreciate the aesthetics of excessive wire, gave me permission to get messy and stringy (and, being a textile artist, I clutched onto that idea for my own use). I could make neat little bridges in my circuitry, but I chose to have large, looping wires. And besides, this is the prototype, not the soldered unit that will go on the incubator - but the soldered unit will likely be loopy, too.
Here is the breadboard wired up with the fan (fan is barely visible in the background to the right):

Honestly, I wouldn't recommend designing your wiring from looking at mine. Andrew Pelling has much better photos with neat and tidy wiring that makes more visual sense. Mine is a jumble.
 |
| Fan schematic. |
That component is mentioned in the Instructable that Andrew refers to (well, the Instructable uses a 1N4004 but I used a 1N4007, since that is what is in the schematic). So, the revised list of components needed:
1x TIP120 transistor, 1x 1kOhm resistor, 1x 100uF cap, 1N4007 diode, 12V DC Fan, 12V power supply.
What I have here that Andrew doesn't show in his photos is this sweet little YwRobot power supply for the breadboard. You can get a similar one here. It even has an on/off switch, so you don't have to unplug your power source every time you want to change the wiring, code, whatever. Great for prototyping. My Arduino is running off the power supply to the breadboard (blue and yellow wires). This power adapter is for 5V, but my 12V fan is running just lovely with it. I've plugged a 12V power supply into it to test it out and it all works. Maybe it'll burn out faster, I'm not sure, but I'm not worried about it right now. The power source I'm using (the power cable I've got plugged into that breadboard power adapter) is an old cable from my Zip drive from many years ago. Sometimes it pays to hoard the obsolete tech! At this point, I have an electronics junkyard growing in my living room.
Here's another look - it's on and the fan is moving:

So, why not just plug directly into the Arduino to power the fan? Because technically it's a 12V power supply you want for the fan, and the Arduino can handle max 5V. For my prototype, though, I am running the fan on 5V. Ultimately, that might even be enough to circulate the heat and CO2. More testing will happen once the rest of the incubator is built.
This is what your IDE should look like, when uploading the fan test code to the Arduino:
(I think there's a newer version IDE available on the Arduino website, but anyway...)
This is the code I copied directly from Andrew Pelling's github and pasted into the Arduino IDE. And by the way, IDE stands for Integrated Development Environment in case you were wondering.

I've been playing with my new fan all day, happy to see life in my build. There is a clear and definite connection between something alive electronically and a biological system, something which I was only able to fully appreciate when I began working with both simultaneously. There is a huge amount of pride in making a system work, or building something that functions well. The process of building that system, whether hacking a biological system or an electronics/digital system, is akin to craft. Craft is making something that works. In the case of this fairly basic project, I've brought obsolete things back to life: electronics zombies! Then, shall we call this e-zombie craft for fun?
Wednesday, June 24, 2015

Thursday, June 11, 2015
posthuman craft
I've written previously about the consideration of the nonhuman agents that participate in my work, willingly or not - can a microorganism even be 'willing' in the way a human can be 'willing' aside from the decision to live or die in a set of circumstances? And how much of that live or die impetus is an actual decision as we understand decision-making? As in, willful?
Karen Barad has written, in her piece entitled, Posthumanist Performativity, about posthumanism as encapsulating the basic principle of decentred human action. That is, a posthumanist world acknowledges that, while humans exist and act on the world, they are not the only influential actors/performers and indeed are often acted upon, themselves by nonhuman performers. This shift in thinking follows the decline of the idea of humanism, or anthropocentrism, that places human beings at the centre of importance in reality/ the world. Humanism itself, I would imagine, followed the decline of placing God or supreme beings at the centre of importance (e.g. religion). So, no longer are gods, gods. And no longer are humans god-like.
More and more exciting and interesting news articles emerge online each day, about the important role of gut bacteria in determining the health and wellbeing of its human host. This is merely one example of a posthumanist perspective on health. The idea of viruses has been around for some time but the latest Radiolab podcast delves into not only the idea of random viruses floating around and interrupting human functioning, but that our own microbes, our embodied bacteria, contain virus DNA as an offense against those viruses that would attack our bodies. Of course, the Radiolab episode is much more than that, but my point is that we have thoroughly culturally shifted into a posthuman consciousness. With this in mind, I realize that I must reframe my current art practice within the parameters of posthumanism. This philosophical framework, often thought of in lieu with robotics, augmentation/prosthetics, computers and the digital, is also fully applicable to biotech but requires a humbled perspective.
I've written on previous blogs that science (health sciences, biotech) and religion promise the same sorts of things. My project, The Ossificatorium, explored the false dichotomy between science and religion. They both promise healing, release from the pain of material existence, and an enduring state of being. What biotech is now focusing on is not simply prolonging or augmenting human life, but on other actants, other forces that make the material world go 'round. We are not gods. Our gods may be the candida albicans, the e. coli, the c. difficile, the bizillions of microorganisms that are more us than us and that influence our moods, outlook, capacity to act in the world. In this vein, my recent biotextile project:
I think of myself as an artist, a creator. You can't get much closer to being god than that occupation. Indeed, humans are creators. However, depending heavily on the activities of another microscopic life form to complete my work for me - and I say 'my' work lightly - is to adopt the posthuman perspective. And I think the posthuman perspective is not so contemporary, either. Farmers, I'm sure, understand environmental actants, insect actants, bacterial actants and cosmological actants as prime influences on the success of their creative endeavours (moreso than themselves). Craft, then: another skilled trade (with a focus on aesthetics and functionality). My skilled trade of creative tissue engineering is completely dependent on the nonhuman actors and it is THEY who are central to the creative process, not ME. This is the crux of posthuman craft as I see it. The question is, can I even call myself an artist in this context? Perhaps I'd be better called a curator? What contribution does my performance make to the end aesthetic/ functional product? Is it an object or is it an entity? Oops, that's another discussion.
I'm not a PhD (yet), so my philosophy is patchy at best, but this (posthumanist question) is one of the critical questions to ask in a BioArt practice, and a critical perspective to engage with in terms of my own work.
Tuesday, June 2, 2015


Thursday, May 7, 2015

Monday, April 20, 2015


Monday, April 6, 2015
cat cancer + future collaborations
I had the pleasure of meeting a kindred spirit recently. It doesn't happen all that often, so I was thrilled.
I met her through Kijiji, where she'd posted an antique school table for sale, and I decided to buy it. You never know who you're dealing with when you interact with someone in a buy/sell capacity on a public forum like Kijiji or Craigslist, and I didn't know what to expect when I went to her house to see the table. The neighbourhood seemed a bit sketchy on the surface, other than that fancy Porsche parked across the street from her front door. However, inside her home was a wonder-filled den of curios, resembling but even better than my own collection.
She is also a bone collector, with very old specimens of tiny, mounted antlers, snakeskins, shells and barnacles, and of course bones, bones, bones. She also had a great art collection, most of which was hung gallery-style on one wall facing her staircase. I was enthralled, and she asked me if I'd like to see her collection upstairs.
In the upstairs of her house is a jewelry studio, also filled with an assortment of curios, including a cabinet with the skeleton of her former pet, a Persian cat. She had the vertebrae separated into glass petri dishes, as well as other parts in their own glass containers. The skull was really interesting, since the face was so flat--much different from my cat skull in my collection at home. Things got really exciting, however, when I began talking to her about my work with bone cancer in the lab. She then brought out the jaw bone of her cat, which was bulging with a calcified specimen of osteosarcoma! Here it is, below:
For me, this was the first time seeing a firsthand specimen of a mineralized osteosarcoma tumour--previous to this, I'd only seen it in photographs. Elaine told me that she hadn't known that her cat had jawbone cancer until after its death, when she received the skeleton from the vet. This is osteobiography, the story of a life written in its bones. Osteosarcoma is actually extremely rare in cats, but the jaw is a fairly common place for it to be found (even in humans).
Let me do the official introduction now: My new friend is Elaine Ho, a Montreal jeweler. I looked at some of her work in her studio, mainly cast pieces, which I loved. We made a plan to keep in touch, perhaps for possible future collaborations. She's interested in casting some of my osteosarcoma biotextiles for jewelry, which could be really interesting. Her work is FANTASTIC, just my style, and you can check out her website, here or find her on Facebook, here.
I met her through Kijiji, where she'd posted an antique school table for sale, and I decided to buy it. You never know who you're dealing with when you interact with someone in a buy/sell capacity on a public forum like Kijiji or Craigslist, and I didn't know what to expect when I went to her house to see the table. The neighbourhood seemed a bit sketchy on the surface, other than that fancy Porsche parked across the street from her front door. However, inside her home was a wonder-filled den of curios, resembling but even better than my own collection.
She is also a bone collector, with very old specimens of tiny, mounted antlers, snakeskins, shells and barnacles, and of course bones, bones, bones. She also had a great art collection, most of which was hung gallery-style on one wall facing her staircase. I was enthralled, and she asked me if I'd like to see her collection upstairs.
In the upstairs of her house is a jewelry studio, also filled with an assortment of curios, including a cabinet with the skeleton of her former pet, a Persian cat. She had the vertebrae separated into glass petri dishes, as well as other parts in their own glass containers. The skull was really interesting, since the face was so flat--much different from my cat skull in my collection at home. Things got really exciting, however, when I began talking to her about my work with bone cancer in the lab. She then brought out the jaw bone of her cat, which was bulging with a calcified specimen of osteosarcoma! Here it is, below:
 |
| Persian cat osteosarcoma, in the collection of Elaine Ho. |
Let me do the official introduction now: My new friend is Elaine Ho, a Montreal jeweler. I looked at some of her work in her studio, mainly cast pieces, which I loved. We made a plan to keep in touch, perhaps for possible future collaborations. She's interested in casting some of my osteosarcoma biotextiles for jewelry, which could be really interesting. Her work is FANTASTIC, just my style, and you can check out her website, here or find her on Facebook, here.
Saturday, April 4, 2015
laboratory yeast infections + biohacking
HOW exciting - my U-2 OS culture on woven horsehair has *actually* begun to form smooth, well-adhered, multiple layers of tissue! This means that the cells, instead of hanging out on the fibres by a thin connection, staying rounded in clumps and potentially ready to fall off with any minor disturbance, have fully engaged now with the fibre and will not fall off, but continue to form real tissue. This is a pivotal moment. You can see what I'm talking about:

That's my uber-scientific screen shot of a zoomed-in image of an iPhone photo through the lens of the microscope. The other weaving, which is done just with catgut surgical sutures, has clumps growing on it:

Some of my other cultures, however, didn't fare so well. The silk cloths inoculated with both U-2 OS and SAOS showed signs of a fungal contamination. One of the dishes with contamination was one that I accidentally dipped the tip of my glove in last week - I was hoping I'd be lucky and not see any contamination, but alas. Interestingly, the fungal contaminant is extremely fibrous. I think it's yeast. Still, I euthanized it. Here's what it looked like:
The second contamination, which I didn't take photos of, appeared to have been a different type of yeast contamination, with globules overtaking the culture completely. From what I've been reading, both contaminations are most likely candida albicans, which in one stage is a mass of hyphae like what we see above (called mycelia), and in another stage is the actual 'yeast' cells (which are pathogenic). So, there we have it: my cultures got a yeast infection and the yeast infection killed the cancer. It's possible the candida came from my own body, either when I was handling the silk barehanded at home in order to clean it before taking it to the lab, or I rubbed against my face or something with my glove while in the lab. Fascinating. Once again, I am (likely) the contaminant. One site explains all this quite well if you're interested in learning more (I am!). Now the question: if candida destroys cancer in vitro, does it do the same in the human body? Is that why we have it naturally present within our bodies in the first place? My friend, Tarsh Bates, whom I met at SymbioticA last year and who was working on her PhD in BioArt, centred all of her research around candida albicans and was doing quite a bit of work with it. I know she was culturing it extensively on agar plates, as well as producing inoculation serum, but I'm not sure if she ever did in culture media as a contaminant or produced mycelium. You can read more about her work, beginning here.
So, I will have to redo the silk cloth experiments and hope no more yeast infections occur.
Now, another fun thing happened today: a biohacking workshop with an awesome Montreal group of scientists, engineers, bioinformatics researchers and artists that I belong to, called Bricobio. It was a workshop to try to come up with a recipe to make your own culture media. Super interesting. Here are some photos from that workshop:
The recipe my group came up with for making our own culture media was:
I'll have to follow up with the results of these experiments once I find out what they were, and how well our funky media worked. This, folks, is how a bio nerd spends her Saturdays.
That's my uber-scientific screen shot of a zoomed-in image of an iPhone photo through the lens of the microscope. The other weaving, which is done just with catgut surgical sutures, has clumps growing on it:
Some of my other cultures, however, didn't fare so well. The silk cloths inoculated with both U-2 OS and SAOS showed signs of a fungal contamination. One of the dishes with contamination was one that I accidentally dipped the tip of my glove in last week - I was hoping I'd be lucky and not see any contamination, but alas. Interestingly, the fungal contaminant is extremely fibrous. I think it's yeast. Still, I euthanized it. Here's what it looked like:
 |
| The small, neat broom-like fibres (hyphae) are the fungus while the larger, longer and unruly fibres are the silk. |
The second contamination, which I didn't take photos of, appeared to have been a different type of yeast contamination, with globules overtaking the culture completely. From what I've been reading, both contaminations are most likely candida albicans, which in one stage is a mass of hyphae like what we see above (called mycelia), and in another stage is the actual 'yeast' cells (which are pathogenic). So, there we have it: my cultures got a yeast infection and the yeast infection killed the cancer. It's possible the candida came from my own body, either when I was handling the silk barehanded at home in order to clean it before taking it to the lab, or I rubbed against my face or something with my glove while in the lab. Fascinating. Once again, I am (likely) the contaminant. One site explains all this quite well if you're interested in learning more (I am!). Now the question: if candida destroys cancer in vitro, does it do the same in the human body? Is that why we have it naturally present within our bodies in the first place? My friend, Tarsh Bates, whom I met at SymbioticA last year and who was working on her PhD in BioArt, centred all of her research around candida albicans and was doing quite a bit of work with it. I know she was culturing it extensively on agar plates, as well as producing inoculation serum, but I'm not sure if she ever did in culture media as a contaminant or produced mycelium. You can read more about her work, beginning here.
So, I will have to redo the silk cloth experiments and hope no more yeast infections occur.
 |
| Can you spot the yeast infection? Look for something round, white and slimy-looking at the top. |
Now, another fun thing happened today: a biohacking workshop with an awesome Montreal group of scientists, engineers, bioinformatics researchers and artists that I belong to, called Bricobio. It was a workshop to try to come up with a recipe to make your own culture media. Super interesting. Here are some photos from that workshop:
 |
| Jutta and Kevin give an intro to bacteria culture and a worm that eats it, C. elegans. |
 |
| Some of our kitchen lab equipment and materials for asepsis/sterilization and hacking culture media. |
The recipe my group came up with for making our own culture media was:
- 2 shot glasses of beef broth (protein? sodium)
- 1/3 shot glass of maple syrup (glucose)
- 6 shot glasses dH2O (distilled water to dilute the mixture)
- 1/3 tsp soy flour (protein?)
 |
| Sterilizing shot glasses in rubbing alcohol, to use as media beakers. True DIY. That's my trusty Tristan behind me. |
 |
| Chemical engineers and other scientists mixing their own DIY media recipes to test them out. |
 |
| Note the selective use of lab coats. |
 |
| Sterilizing our fresh culture media. |
 |
| Our culture media in the warm water bath after inoculation: one is inoculated with saliva and the other with distilled water to use as a negative control in the testing. |
Thursday, April 2, 2015
biotext
 |
| click image to enlarge |
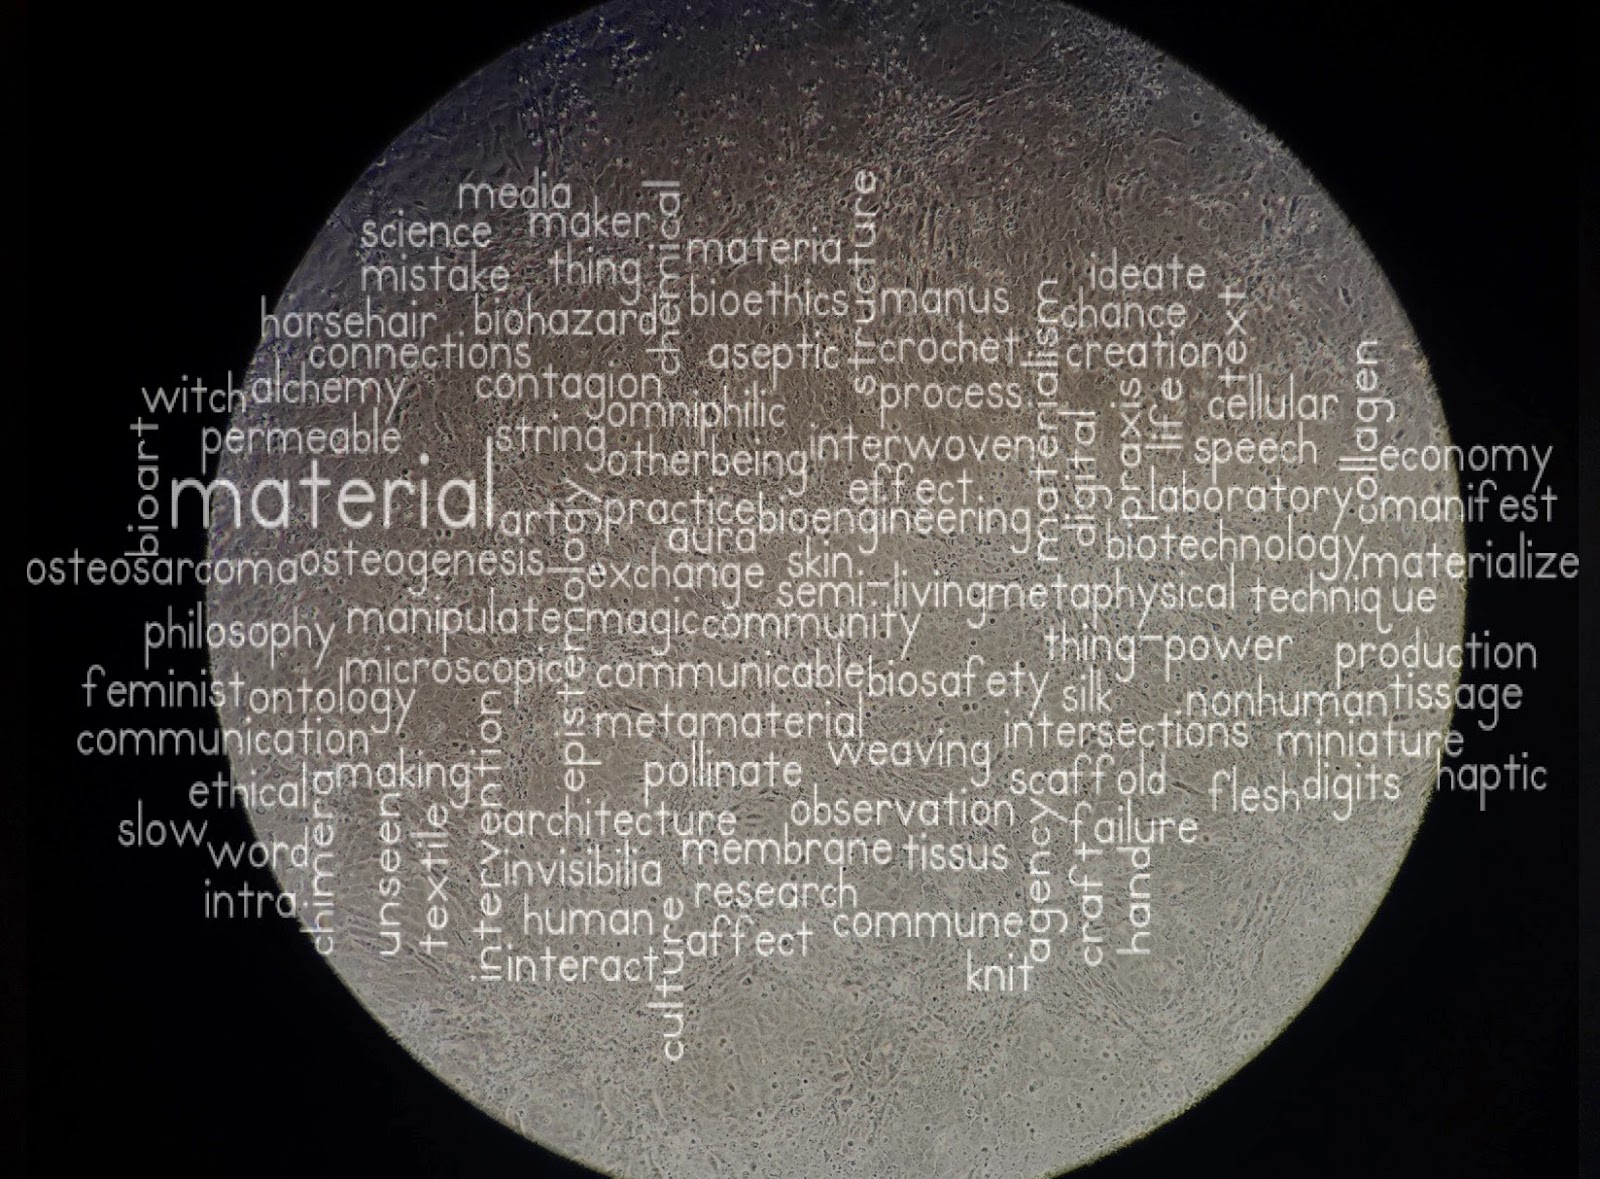
Wordclouds are useful for mixing up ideas and generating new ones. My favourites from this one that I generated: nonhuman tissage, miniature haptic, materia bioethics, feminist ontology, unseen textile, architecture membrane, omniphilic otherbeing, science mistake, scaffold failure, digital praxis, semi-living metaphysical technique... and on an on. I've made numerous wordclouds in different configurations with this same wordset. I'm building on my glossary and ramping up my mental expansion by doing this. Other words that have come up that I like: microscopic text, metaphysical production, haptic commune, slow laboratory, membrane maker, feminist manifest, permeable community, knit word, observation philosophy, interwoven biohazard, string chance, architecture intervention, agency intersections. I can use all of these new iterations of ideas when writing about my work. Best autobrainstorming application ever! You can do it, too, here.
Wednesday, April 1, 2015
mani-festation/ materialization
manifest/materialize:
mani - manus - hand
we manifest reality by hand/ manipulate material
we embody
a process of creation, through our own external efforts + those of our internal microorganisms
materialize
tissus - tissage = flesh + weaving
These are thought and concept fragments.
Staring into a microscope and watching and waiting, waiting, waiting, waiting, waaaaaaaiting for otherbeings to do their work in order to complete my work, makes me insane. !
so I wove a thing and manifested a tissu/tissage - the 'act' and the 'thing' are the same word (tissage/ weaving) + tissu translates to both 'cloth' and 'flesh'
Materiality
Digiterial
digits - fingers - digital handmade - jacquard=machine/woman/computer
This hybrid birth by a cyborg artist
The cloth will only actually be birthed off the front roll bar of the loom early next week when the warp is cut and the full length unrolled, but here is the view of the object on the loom during and after I finished weaving, FOR 12 HOURS STRAIGHT. I was in a manic flow and did not disrupt it because when a creative wave hits like that, you ride it to the very end. I was possessed.
I wove sitting down until my bum wouldn't let me sit anymore on that horrid wooden bench. Then I wove standing up and rocking back and forth with the shuttle shots, for approximately 5 hours. I danced this cloth into being, wearing the devil's shoes, blasting vintage hits and chill dub throughout the industrial room that overlooks the Saint Lawrence river and entire (Montreal) south-facing city scape that lay out 10 floors below. I still cannot comfortably sit down (a health and safety hazard referred to as "weaver's bottom"). It was bliss.
Next I must repair the broken threads post cut-off from the loom.
Repair - mend - it is in our nature to repair, regenerate.
Knot magic.
More here on "white witches who cast knot magic" using horse hair.
More on horse hair in a minute.
The weaving specs, where each thread equals 1 pixel of an image:
1700 pixels wide x 2400 pixels long @ 40 dpi (or threads per inch) - each thread intersection makes a dot in the image... meaning, the weaving is theoretically 42.5" x 60" but I can guarantee it's longer than that due to my 'hand'. Digitally, the dimensions are what they are, but digits/hand variances in my beat, speed, tension (all those things that determine the resultant cloth density) alter those dimensions. My signature weaving style/make are referred to as my 'hand', as is the drape and feel of the cloth post-finishing. Sometimes the digital design has to be altered to account for the hand of the weaver.
The image is constructed of 12 different twill type cloth structures which blend together to render the image, each one of the 12 representing a different shade of grey in the image, meaning I had to reduce the original image down to 12 shades. This reduction is a labourious part of the computer-assisted design process and took about 2 hours to accomplish. Here is the original image (which was around 200 different colours and shades), of connective tissue cell growth on my miniature handwoven collagen surgical sutures:
It is meta-material.
There's something else about this weaving.
There was a threading mistake in the warp, which I had the option to have fixed or to leave as it was. I decided to *not* fix the threading mistake, which existed prior to my taking up the weaving shuttle. This odd thread out is visible in some parts of the cloth, disrupting the wonderful illusion of the image. This intentional leaving-in of a 'mistake' is a nod to the ancient weavers who intentionally wove mistakes into their cloths in order to avoid angering the gods, because they believed that only the gods can create perfection. Other than this found/intended threading mistake, the weaving is perfect. This is also my nod to the notion of meddling in biotechnology as 'playing god' with living forms/ life and the many things that can go wrong.
To conclude, the knot magic and the white horse hair I'm manipulating in the lab:
Now,
Also,
Lastly, I want to share some of my observations of the cells in culture. Both U-2 OS and SAOS-2 behave in uncharacteristic ways, cellularly-speaking. They don't simply adhere to a surface and proliferate through mitosis and forming a monolayer. They are in constant rapid mitosis and spitting cells into the suspension media (the liquid they're in), almost like pollination. They spread to other parts of the flask this way, without having to use motility to crawl along and spread. They simply land somewhere else and begin a new colony there. We can see why cancer spreads so quickly in some cases - because it uses both cell motility AND some kind of cellular pollination method.
Another observation: my massively confluent cultures (which I've decided to allow to overgrow the flasks instead of splitting them into new flasks) have begun to form the most interesting channels of cells, like wide branchy root systems almost like lace patterns, or knit bones. I think this is the tumour tissue itself. See below.
What I've discovered about the osteosarcomas is that they seem to grow both horizontally and vertically at competing rates - in some cases, especially with the SAOS, they actually grow vertically faster (which is unusual behavior for cells).
In my next post, I'll include some of my new protocols, like for prepping silk for cell culture, etc.
mani - manus - hand
we manifest reality by hand/ manipulate material
we embody
a process of creation, through our own external efforts + those of our internal microorganisms
materialize
tissus - tissage = flesh + weaving
These are thought and concept fragments.
Staring into a microscope and watching and waiting, waiting, waiting, waiting, waaaaaaaiting for otherbeings to do their work in order to complete my work, makes me insane. !
so I wove a thing and manifested a tissu/tissage - the 'act' and the 'thing' are the same word (tissage/ weaving) + tissu translates to both 'cloth' and 'flesh'
Materiality
Digiterial
digits - fingers - digital handmade - jacquard=machine/woman/computer
This hybrid birth by a cyborg artist
The cloth will only actually be birthed off the front roll bar of the loom early next week when the warp is cut and the full length unrolled, but here is the view of the object on the loom during and after I finished weaving, FOR 12 HOURS STRAIGHT. I was in a manic flow and did not disrupt it because when a creative wave hits like that, you ride it to the very end. I was possessed.
 |
| The beginning. |
 |
| I wound and wove about 20+ of these yarn-filled bobbins. |
Next I must repair the broken threads post cut-off from the loom.
Repair - mend - it is in our nature to repair, regenerate.
Knot magic.
More here on "white witches who cast knot magic" using horse hair.
More on horse hair in a minute.
The weaving specs, where each thread equals 1 pixel of an image:
1700 pixels wide x 2400 pixels long @ 40 dpi (or threads per inch) - each thread intersection makes a dot in the image... meaning, the weaving is theoretically 42.5" x 60" but I can guarantee it's longer than that due to my 'hand'. Digitally, the dimensions are what they are, but digits/hand variances in my beat, speed, tension (all those things that determine the resultant cloth density) alter those dimensions. My signature weaving style/make are referred to as my 'hand', as is the drape and feel of the cloth post-finishing. Sometimes the digital design has to be altered to account for the hand of the weaver.
 |
| The fully woven item, which wraps a number of times around the lower beam seen here. Also note the bench from hell. |
The image is constructed of 12 different twill type cloth structures which blend together to render the image, each one of the 12 representing a different shade of grey in the image, meaning I had to reduce the original image down to 12 shades. This reduction is a labourious part of the computer-assisted design process and took about 2 hours to accomplish. Here is the original image (which was around 200 different colours and shades), of connective tissue cell growth on my miniature handwoven collagen surgical sutures:
 |
| This image was captured for me by Guy Ben-Ary. |
It is meta-material.
There's something else about this weaving.
There was a threading mistake in the warp, which I had the option to have fixed or to leave as it was. I decided to *not* fix the threading mistake, which existed prior to my taking up the weaving shuttle. This odd thread out is visible in some parts of the cloth, disrupting the wonderful illusion of the image. This intentional leaving-in of a 'mistake' is a nod to the ancient weavers who intentionally wove mistakes into their cloths in order to avoid angering the gods, because they believed that only the gods can create perfection. Other than this found/intended threading mistake, the weaving is perfect. This is also my nod to the notion of meddling in biotechnology as 'playing god' with living forms/ life and the many things that can go wrong.
To conclude, the knot magic and the white horse hair I'm manipulating in the lab:
 |
| u-2 os (osteosarcoma) cells on woven horse hair after 1.5 weeks |
 |
| And the same horse hair weaving with u-2 os after 2 weeks. |
Now,
 |
| This is crocheted horse hair with a new batch of u-2 os (only a few days old here) |
 |
| I did this with silk organza to create miniature cloth scaffolds and enculturated them with both u-2 os and saos cells. |
 |
| Micrograph of the above image. Only a few days old here, and just a few adhered to the silk fibres. It'll be interesting to see how the cells react to the silk, given the natural indicators contained in silk for healthy bone growth. |
Lastly, I want to share some of my observations of the cells in culture. Both U-2 OS and SAOS-2 behave in uncharacteristic ways, cellularly-speaking. They don't simply adhere to a surface and proliferate through mitosis and forming a monolayer. They are in constant rapid mitosis and spitting cells into the suspension media (the liquid they're in), almost like pollination. They spread to other parts of the flask this way, without having to use motility to crawl along and spread. They simply land somewhere else and begin a new colony there. We can see why cancer spreads so quickly in some cases - because it uses both cell motility AND some kind of cellular pollination method.
Another observation: my massively confluent cultures (which I've decided to allow to overgrow the flasks instead of splitting them into new flasks) have begun to form the most interesting channels of cells, like wide branchy root systems almost like lace patterns, or knit bones. I think this is the tumour tissue itself. See below.
 |
| u-2 os cell culture allowed to grow past confluency for more than a month. |
What I've discovered about the osteosarcomas is that they seem to grow both horizontally and vertically at competing rates - in some cases, especially with the SAOS, they actually grow vertically faster (which is unusual behavior for cells).
In my next post, I'll include some of my new protocols, like for prepping silk for cell culture, etc.
Subscribe to:
Posts (Atom)